Imagine having the power to control your Raspberry Pi from anywhere in the world using just a web browser. No extra apps, no complicated setups—just pure simplicity. Whether you're a tech enthusiast or a beginner, controlling your Raspberry Pi via web browser is not only possible but also incredibly useful. This guide will take you through every step, ensuring you’re equipped with the knowledge to harness this incredible capability.
So, why should you care about controlling your Raspberry Pi via web browser? Well, it opens up a world of possibilities. You can manage your home automation systems, monitor security cameras, or even run complex applications—all from the comfort of your favorite web browser. It's like giving your Raspberry Pi superpowers without breaking the bank.
This article dives deep into the process, breaking down complex concepts into bite-sized pieces. We'll cover everything from setting up the environment to troubleshooting common issues. By the end, you’ll be ready to take full control of your Raspberry Pi like a pro. Let’s get started!
Table of Contents
Setting Up Your Raspberry Pi for Web Access
Understanding Your Network Configuration
Installing a Web Server on Raspberry Pi
Controlling Raspberry Pi via Web Browser
Alternative Tools for Web-Based Control
Future Trends in Raspberry Pi Control
Setting Up Your Raspberry Pi for Web Access
Alright, let’s kick things off by setting up your Raspberry Pi. First things first, make sure your Pi is up and running. Power it on, connect it to a monitor, and ensure everything’s working smoothly. Now, here’s the deal: you’ll need to configure your Pi so it can communicate over your local network. This involves assigning it a static IP address. Why? Because a static IP ensures your Pi remains accessible even after a reboot.
Once you’ve nailed the static IP, it’s time to update your system. Open up the terminal and run these commands:
sudo apt update && sudo apt upgrade -y
This’ll make sure your Pi is running the latest software versions. Now, here’s the fun part: you’ll need to enable SSH. SSH is like a secret tunnel that lets you securely connect to your Pi remotely. To enable it, head over to the Raspberry Pi Configuration tool and flip the SSH switch to ‘on.’ Easy, right?
Why Static IP Matters
Let’s break it down. A static IP ensures consistency. Without it, your Pi might get assigned a different IP address every time it reconnects to the network. This would make remote access a nightmare. So, setting a static IP is like giving your Pi a permanent address on your network.
Choosing the Right Software
Now that your Pi’s all set up, it’s time to choose the right software. There are tons of options out there, but we’ll focus on two popular ones: Flask and Node-RED. Flask is a lightweight Python framework that’s perfect for building web interfaces. Node-RED, on the other hand, is a flow-based programming tool that’s great for visual learners.
Flask is ideal if you’re comfortable with Python. It allows you to create custom web pages and APIs with ease. Node-RED, however, shines when it comes to integrating with IoT devices. It has a drag-and-drop interface that makes setting up complex workflows a breeze.
Flask vs Node-RED
So, which one should you pick? If you’re into coding and want full control, go for Flask. But if you prefer a more visual approach, Node-RED’s your best bet. Both have their strengths, so it really depends on your comfort level.
Understanding Your Network Configuration
Before we dive deeper, let’s talk about your network. Understanding your network setup is crucial for successful web access. You’ll need to know your router’s IP address, subnet mask, and gateway. These details help your Pi communicate with other devices on the network.
Another important concept is port forwarding. This allows external devices to access your Pi over the internet. For example, if you want to control your Pi from outside your home network, you’ll need to forward a specific port on your router to your Pi’s IP address. It’s like creating a direct line of communication.
Port Forwarding Made Simple
Here’s a quick guide to setting up port forwarding. Log into your router’s admin panel, usually by typing 192.168.1.1 into your browser. Navigate to the port forwarding section and add a new rule. Set the external port to something like 8080 and the internal port to 80. Then, point it to your Pi’s static IP. Voila! You’re all set.
Installing a Web Server on Raspberry Pi
Alright, next step: installing a web server. This is where the magic happens. A web server allows your Pi to host web pages and APIs that can be accessed via a browser. There are several options, but we’ll focus on Apache and NGINX.
Apache is a reliable choice for beginners. It’s easy to set up and widely supported. To install Apache, simply run:
sudo apt install apache2 -y
NGINX, on the other hand, is known for its speed and efficiency. It’s a great option if you’re dealing with high traffic. Installation’s a breeze too:
sudo apt install nginx -y
Which Web Server Should You Use?
It really depends on your needs. If you’re just starting out, Apache’s a safe bet. But if you’re planning to run a high-performance application, NGINX might be the way to go. Both are excellent choices, so don’t stress too much about it.
Securing Your Raspberry Pi
Security’s a big deal when it comes to remote access. You don’t want random strangers messing with your Pi, right? So, let’s talk about securing your setup. First, change the default password. Seriously, don’t skip this step. Use a strong, unique password that’s hard to guess.
Next, consider setting up a firewall. This’ll block unauthorized access and keep your Pi safe. You can use UFW (Uncomplicated Firewall) to simplify things. To enable it, run:
sudo ufw enable
Finally, think about using SSL certificates. These encrypt your data, making it much harder for hackers to intercept sensitive information.
Firewall Basics
Here’s a quick rundown on setting up UFW. Allow SSH and HTTP traffic by running:
sudo ufw allow 22
sudo ufw allow 80
This’ll ensure your Pi remains accessible while keeping unwanted visitors at bay.
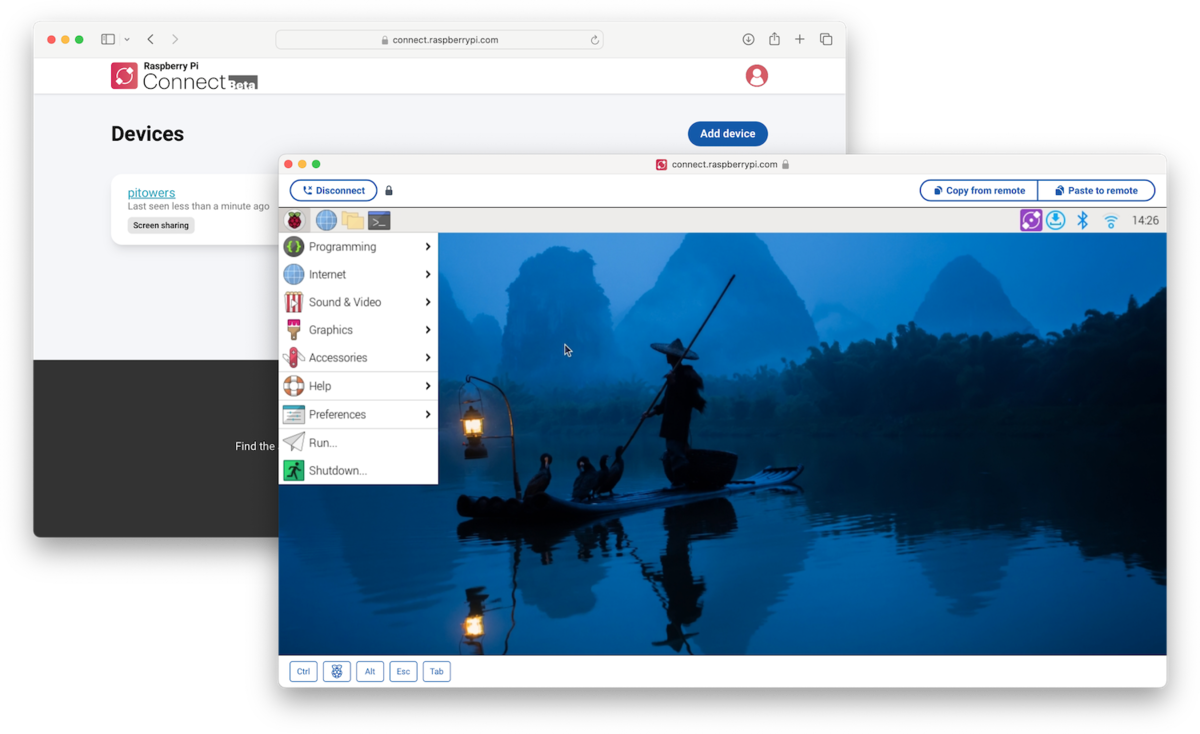
Enabling Remote Access
Now that your Pi’s secure, it’s time to enable remote access. There are several ways to do this, but we’ll focus on two: SSH and VNC. SSH allows you to control your Pi via the command line, while VNC gives you a full graphical interface.
To set up SSH, we’ve already covered the basics earlier. Just make sure it’s enabled and configure your router for port forwarding. For VNC, you’ll need to install the VNC Server on your Pi. Once installed, you can connect to it using any VNC client from your computer or mobile device.
VNC vs SSH
Which one’s better? It depends on what you need. If you’re comfortable with the command line, SSH’s the way to go. But if you prefer a visual interface, VNC’s your best friend. Both have their advantages, so it’s up to you to decide.
Controlling Raspberry Pi via Web Browser
Finally, the moment you’ve been waiting for: controlling your Raspberry Pi via web browser. With everything set up, you can now access your Pi from any device with a browser. Simply type your Pi’s IP address followed by the port number into the address bar. For example: http://192.168.1.100:8080
If you’re using Flask, you’ll see a custom web page that you’ve created. This page can include buttons, sliders, and other interactive elements to control your Pi. Node-RED, on the other hand, provides a dashboard interface that’s easy to navigate.
Customizing Your Web Interface
Want to make your web interface look amazing? You can customize it using HTML, CSS, and JavaScript. Add some styling to make it visually appealing and include interactive elements to enhance functionality. The possibilities are endless!
Alternative Tools for Web-Based Control
While Flask and Node-RED are great, there are other tools you can explore. One such tool is Home Assistant. It’s a powerful home automation platform that integrates seamlessly with Raspberry Pi. Another option is OpenHAB, which offers a wide range of plugins and integrations.
These tools provide more advanced features and are perfect for those looking to take their Pi projects to the next level. They might require a bit more setup, but the results are definitely worth it.
Why Use Home Assistant?
Home Assistant’s a game-changer for home automation enthusiasts. It allows you to control multiple devices from a single interface. Plus, it’s open-source, meaning you can customize it to fit your needs. If you’re serious about smart home automation, give it a try.
Troubleshooting Common Issues
Even the best setups can run into issues. Here are some common problems and how to fix them:
- Can’t Connect to Pi: Double-check your IP address and ensure SSH or VNC is enabled.
- Slow Performance: Make sure your Pi’s not overheating and that it has enough RAM.
- Security Warnings: Install SSL certificates to encrypt your data.
If all else fails, consult the official Raspberry Pi documentation or seek help from online communities. Chances are, someone’s already encountered and solved your issue.
Future Trends in Raspberry Pi Control
As technology advances, so do the possibilities for Raspberry Pi control. We’re seeing more integration with AI, machine learning, and cloud services. These advancements open up new avenues for automation and remote control.
Imagine controlling your Pi with voice commands or using it as a hub for IoT devices. The future’s bright, and the Raspberry Pi is at the forefront of this revolution. Stay tuned for exciting developments in the world of Raspberry Pi control!
Kesimpulan
And there you have it—everything you need to know about controlling your Raspberry Pi via web browser. From setting up your Pi to securing your network, we’ve covered it all. Remember, the key to success is understanding your needs and choosing the right tools for the job.
Now it’s your turn to take action. Try out the steps we’ve discussed and see how they work for you. Don’t forget to share your experiences in the comments below. And if you found this article helpful, be sure to check out our other guides for more awesome Raspberry Pi tips and tricks. Happy tinkering!